If you love to cook, you most likely have recipes you have cut out from magazines. I have a binder that I place these little jewels in so I can find them. Keeping all my recipes on a file in my computer just isn't me. I am a sensory type person, I like to feel the book in my hand. I do have a computer file for recipes I find on the Internet although it's almost enough to put a cook into sensory overload!
Feeding those I love delicious and healthy foods make me feel successful. Southern food has gotten such a bad rap for being deep fried and full of calories. Cooked correctly it can be a very healthy diet. I know the term Healthy Southern...may make you laugh! My challenge is to prove that Southern style cooking is healthy, delicious & easy to cook.
I am working on a cookbook and would love to hear from others on what they think is Southern style cooking. If you are from the South you know we are a melting pot of so many different cultures. Our table is blessed with Mexican, Creole, German & many more home style foods. We all come back to the table for the food that feeds our souls.

"Food feeds your body...Southern food sustains your soul!"
Showing posts with label healthy eating. Show all posts
Showing posts with label healthy eating. Show all posts
Sunday, February 5, 2012


Wednesday, September 21, 2011
Smoked Chipotle Turkey Breast
Smoked Turkey is one of my favorite meats. I love to eat it straight from the pan,& so does everyone else in our family! We smoke whole turkeys when we have lots of time, but if you want the smoked turkey experience & have less than a few hours to get it, try a half turkey breast.

Williamson Bros Bar-B-Q has a chipotle sauce that is really great. The chipotle taste is prominent but it also has a cumin and garlic note that is very pleasing. This sauce adds a smoky flavor to your meats from the inherent taste of the chipotle itself.
If you haven't tried chipotles, you should give them a chance. These little wet, wrinkled chili peppers come in a can & are packed in adobo sauce. It isn't necessary to remove the sauce, it actually adds incredible taste to any dish.
http://www.livestrong.com/article/416613-chipotle-pepper-benefits/?utm_source=popslideshow&utm_medium=a1
We marinated our half turkey bone-in breast in the refrigerator over night in a mixture of 2 tablespoons of Williamsons Spicy Chiptole BBQ sauce & 2 teaspoons of pecan flavored liquid smoke. If you have never used a smoke flavoring, you can find it in the grocery isle with the steak sauce, bbq sauce etc. I like the pecan because it doesn't overpower the other seasonings.
Injecting a mixture of half sauce & half olive oil into the breast will keep the meat moist while smoking. It's also healthier than butter, but if you need the butter...it's your call!

When you are ready to start smoking the turkey breast, remove it from the fridge & let it sit on the counter & come to close to room temperature. About 15-20 minutes will usually be enough time. While it is resting, start your wood pellets in your smoker box on your gas grill. I turn my grill to high & sit the smoker box in the back corner. Do not wet the pellets or wood.
I like to smoke my turkey breasts in an iron skillet. I do not wrap in foil, that tends to steam the meat & you don't get the results you are looking for.

After about 30 minutes the grill should have enough smoke to start the smoking process. Reduce the temperature to medium indirect heat. With the turkey breast in a well seasoned iron skillet, coat it on all sides with the sauce before placing it on the grill.
What I like about Williamson Bros sauce is the consistency. It isn't thin, but it isn't thick & sticky. This type of sauce is the best for gas grill smoking because of the lower sugar content of the sauce.

During the smoking process I apply sauce to all the sides every 10 minutes.
Remember that you should have your grill on medium indirect heat. The temperature inside the grill should be about 300 degrees. The skillet should be sitting in the middle of the grill with no flame under it. Although this is only a breast, it can dry out quickly so keep it well marinated with sauce.

I cook my turkey breast to a temperature of 170 degrees. This usually takes about 30-45 minutes on my grill, but ever grill is different & the outside air temperature is a factor also. Just judge your doneness on that meat temperature...this is just a really great reason to go buy a cool meat thermometer!

After it cools a little, I remove the meat from the bone, leaving the skin intact. You can remove the skin but it really adds to the taste & look of the smoked turkey.

We added Williamson Bros Spiccy Chipotle Bar-B-Q sauce to the top of the turkey breast. Simple turkey taken to another level. Healthy & delicious, we had baked sweet potatoes from the grill to complete this meal. Oh & we had salad...just hard to do on the grill! Although I am wanting to do the grilled romain lettuce so who knows...we just might do that!
Williamson Bros Bar-B-Q sauces impressed me in many different ways, but one of the things I loved was the low sugar content. Many people who are on a sugar restricted diet must avoid bbq like the plaque. Being a RN & working with diabetics I can say this sauce is a great choice for sugar & carbohydrate counts. Best part is they are really good!
Visit Willamson Bros Bar-B-Q website today!
www.williamsonbros.com

Williamson Bros Bar-B-Q has a chipotle sauce that is really great. The chipotle taste is prominent but it also has a cumin and garlic note that is very pleasing. This sauce adds a smoky flavor to your meats from the inherent taste of the chipotle itself.
If you haven't tried chipotles, you should give them a chance. These little wet, wrinkled chili peppers come in a can & are packed in adobo sauce. It isn't necessary to remove the sauce, it actually adds incredible taste to any dish.
http://www.livestrong.com/article/416613-chipotle-pepper-benefits/?utm_source=popslideshow&utm_medium=a1
We marinated our half turkey bone-in breast in the refrigerator over night in a mixture of 2 tablespoons of Williamsons Spicy Chiptole BBQ sauce & 2 teaspoons of pecan flavored liquid smoke. If you have never used a smoke flavoring, you can find it in the grocery isle with the steak sauce, bbq sauce etc. I like the pecan because it doesn't overpower the other seasonings.
Injecting a mixture of half sauce & half olive oil into the breast will keep the meat moist while smoking. It's also healthier than butter, but if you need the butter...it's your call!

When you are ready to start smoking the turkey breast, remove it from the fridge & let it sit on the counter & come to close to room temperature. About 15-20 minutes will usually be enough time. While it is resting, start your wood pellets in your smoker box on your gas grill. I turn my grill to high & sit the smoker box in the back corner. Do not wet the pellets or wood.
I like to smoke my turkey breasts in an iron skillet. I do not wrap in foil, that tends to steam the meat & you don't get the results you are looking for.

After about 30 minutes the grill should have enough smoke to start the smoking process. Reduce the temperature to medium indirect heat. With the turkey breast in a well seasoned iron skillet, coat it on all sides with the sauce before placing it on the grill.
What I like about Williamson Bros sauce is the consistency. It isn't thin, but it isn't thick & sticky. This type of sauce is the best for gas grill smoking because of the lower sugar content of the sauce.

During the smoking process I apply sauce to all the sides every 10 minutes.
Remember that you should have your grill on medium indirect heat. The temperature inside the grill should be about 300 degrees. The skillet should be sitting in the middle of the grill with no flame under it. Although this is only a breast, it can dry out quickly so keep it well marinated with sauce.

I cook my turkey breast to a temperature of 170 degrees. This usually takes about 30-45 minutes on my grill, but ever grill is different & the outside air temperature is a factor also. Just judge your doneness on that meat temperature...this is just a really great reason to go buy a cool meat thermometer!

After it cools a little, I remove the meat from the bone, leaving the skin intact. You can remove the skin but it really adds to the taste & look of the smoked turkey.

We added Williamson Bros Spiccy Chipotle Bar-B-Q sauce to the top of the turkey breast. Simple turkey taken to another level. Healthy & delicious, we had baked sweet potatoes from the grill to complete this meal. Oh & we had salad...just hard to do on the grill! Although I am wanting to do the grilled romain lettuce so who knows...we just might do that!
Williamson Bros Bar-B-Q sauces impressed me in many different ways, but one of the things I loved was the low sugar content. Many people who are on a sugar restricted diet must avoid bbq like the plaque. Being a RN & working with diabetics I can say this sauce is a great choice for sugar & carbohydrate counts. Best part is they are really good!
Visit Willamson Bros Bar-B-Q website today!
www.williamsonbros.com
Monday, September 12, 2011
Grilled Chicken & Spinach Roulade with Williamson Bro's Honey BBQ Sauce
Contrary to popular belief we Southerners really do know how to cook things with style, even on the grill. The days of backyard cooks only producing meats that are so tough you could let the dog use them for a chew toy are over! We cook with style & class now...even if we do hang out at Bass Pro shop or Cabela's discussing the best wood pellets or wood for smoking. Also never think it's just the men doing this, we ladies are a force to be reckoned with!
To continue my review of Willamson Bros. Bar-B-Q sauces I created a new recipe to showcase their Honey BBQ sauce. After opening it & tasting it ...my cook's mind went into high gear. I like this one because as a whole, it's incredible, but the honey taste is so smooth on the tongue. It has a gentle mustard flavor, very mild but it blends so well with the honey. I taste the chili powder, garlic & spices but nothing is overwhelming to the palate.

After tasting the sauce I choose to make a chicken thigh stuffed with spinach & smokey provolone cheese. I marinated my boneless, skinless chicken thighs in pecan liquid smoke & seasoned them well with New Southern Pantry's Rustic Chef Seasoning.

I let my meats marinate overnight usually, but if you don't have that long, an hour or so will work. Remove them from the fridge about 15 minutes before you get ready to roll them. Never put meat straight from the cold of the refrigerator on the grill. it will greatly change the cook time & make your food either under or over cooked. Neither is a good option!
Roll the chicken thighs with a stick of cheese & about 2 tablespoons of chopped spinach inside. Wrap a piece of bacon around the outside and secure with a wooden toothpick.


I cooked these on a direct medium high heat on my Weber gas grill. I cooked them about 4-5 minutes on each side then tested for temperature.They should cook to an internal temp of 180 degrees. Invest in a good stick style thermometer if you don't have one. You will need to check the temperature at least once, but probably twice. All grills cook different depending on type & also on the thickness of the thigh.

Before placing my roulades on the grill I brushed the top side with Williamson Bro's Honey Bar-B-Q sauce. I didn't brush the bottom to prevent the initial side from sticking to the grill due to the sauce. I also brushed the bacon that is wrapped around the chicken thigh with BBQ sauce to caramelize it.


To continue my review of Willamson Bros. Bar-B-Q sauces I created a new recipe to showcase their Honey BBQ sauce. After opening it & tasting it ...my cook's mind went into high gear. I like this one because as a whole, it's incredible, but the honey taste is so smooth on the tongue. It has a gentle mustard flavor, very mild but it blends so well with the honey. I taste the chili powder, garlic & spices but nothing is overwhelming to the palate.


I let my meats marinate overnight usually, but if you don't have that long, an hour or so will work. Remove them from the fridge about 15 minutes before you get ready to roll them. Never put meat straight from the cold of the refrigerator on the grill. it will greatly change the cook time & make your food either under or over cooked. Neither is a good option!
Roll the chicken thighs with a stick of cheese & about 2 tablespoons of chopped spinach inside. Wrap a piece of bacon around the outside and secure with a wooden toothpick.


I cooked these on a direct medium high heat on my Weber gas grill. I cooked them about 4-5 minutes on each side then tested for temperature.They should cook to an internal temp of 180 degrees. Invest in a good stick style thermometer if you don't have one. You will need to check the temperature at least once, but probably twice. All grills cook different depending on type & also on the thickness of the thigh.

Before placing my roulades on the grill I brushed the top side with Williamson Bro's Honey Bar-B-Q sauce. I didn't brush the bottom to prevent the initial side from sticking to the grill due to the sauce. I also brushed the bacon that is wrapped around the chicken thigh with BBQ sauce to caramelize it.
After cooking for about 4 minutes I turned the chicken over & brushed the top with sauce. You need to continue to baste the roulade while cooking to keep it moist. Chicken is so easy to dry out on the grill at this heat so don't hold back on the sauce!


These made a delicious dish out of simple chicken thighs, spinach, cheese, & bacon. So easy & so elegant looking when plated

And when you add the delicious Williamson Bros Honey BBQ sauce, it's an elegant dinner to serve for any occasion! I like to heat the BBQ sauce to serve on the table also if someone wants to add more. There is just nothing worse on warm chicken than cold sauce!

Slicing into this Chicken Roulade shows the melting cheese & the spinach. You can use any type of hard cheese in this dish. I think a cheddar with grilled red onions would be delicious. That's the fun of cooking, no rules...just try it!

Visit Willamson Bros Bar-B-Q to order this great sauce. You won't be disappointed if you like real Southern BBQ with full flavored sauces.
For the New Southern Pantry Rustic Chef Seasoning we used to marinate the chicken, visit our website.
Friday, September 2, 2011
Williamson Bros Classic Carolina BBQ Sauce

Slow Smoked Pulled Pork & Williamson Bros Classic Carolina BBQ Sauce
about to join this crusty bread to become a Carolina styled sandwich!
Being from Texas, we didn't smoke as much pork butt as we did beef brisket. I will never forget the first time I tried to make a pork butt/shoulder. I watched someone pull that delicious looking meat & knew it would be no big deal, I'm a cook, worked in restaurants...well I was so wrong! No one told me you have to do it while it is extremely warm...hot to be exact. Also no one shared with me the fact that this is best done with your God given forks..your fingers. So the first pulled pork we had was hideous & I swore to never try that again.
Fast forward about 5 yrs, ate at a BBQ joint in Kentucky & had a Carolina Pulled Pork Sandwich. When it came out it had green stuff falling out the sides of it. I soon realized it was Cole Slaw...on my meat. No respectful Texan would ever throw wet veggies on perfectly good smoked meat that was slathered in BBQ sauce. I was pretty sure they would take my native Texan card for doing that.
Being the polite Southern girl that I am (no comments) I smiled at the waitress & in my head was trying to figure out how to take that Cole Slaw off the sandwich & make it into what it was..a side dish. My husband picked up his sandwich/salad in his hand & proceeded to take a huge bite. I watched as juices started to run down his hands like a broken pipeline! BBQ sauce mixed with Cole Slaw dressing...oh this couldn't be happening!
Now being polite is very important to me, especially in public, so I took a small bite to try to look hungry. First bite was hard to swallow, but when my brain got the signal that what I had just eaten may have been a little bit tasty, I took the next bite. The rest is history! Carolina style pulled pork sandwiches are one of my favorite things to make & eat.

Carolina Style Bar-B-Q Sandwich

Beautiful Williamson Bros Classic Carolina Sauce on Pulled Pork
make a Carolina Styled Pulled Pork Sandwich very authentic!
Williamson Bros Classic Carolina BBQ sauce is unique with a sweet mustard taste, full of spices & a little vinegar undertone. I really like the touch of bay leaf, it lingers after the other flavors mellow. Just a great sauce, not too sweet & just perfect for smoked pork butt. Can't wait to try it on some new dishes, I think a red potato salad may be on the drawing board with this one!
Try some of their sauces , I have three more to review next week, so watch for the new blog posts!
Thursday, September 1, 2011
Williamson Bros BBQ Sauce
I always feel so honored to review a company's product on my blog. When you develop an item, it becomes so personal to you. When you put your families name on every bottle, that ups the game even more.
Williamson Bros.Bar-B-Q of Marietta Georgia were so very gracious to send me a gift pack of their BBQ sauces to review. I was so excited when I got the box from UPS, I had to open it right away. I know this is silly...sentimental...& totally Southern but it was like getting a little bit of home in Nebraska.

This company had it's beginning's when two brothers & one employee opened a Bar-B-Q place in Marietta Georgia with little money but lots of good food! That was in March of 1990 & they have three locations now serving great Southern BBQ.


Williamson Bro's B-B-Q sauce can be found online at
http://www.williamsonbros.com
When you order this sauce & it arrives at your front door, even if your not from the South...you'll still feel the Southern style BBQ love, I promise!
Watch for our reviews of the other 4 sauces soon!
Thanks again to Williamson Bro's BBQ for introducing me to their products!
Williamson Bros.Bar-B-Q of Marietta Georgia were so very gracious to send me a gift pack of their BBQ sauces to review. I was so excited when I got the box from UPS, I had to open it right away. I know this is silly...sentimental...& totally Southern but it was like getting a little bit of home in Nebraska.

This company had it's beginning's when two brothers & one employee opened a Bar-B-Q place in Marietta Georgia with little money but lots of good food! That was in March of 1990 & they have three locations now serving great Southern BBQ.

Williamson Bro's Roasted Garlic B-B-Q Sauce
New York Strip Steaks patiently waiting !
When I opened the Roasted Garlic B-B-Q sauce, the aroma of garlic was intoxicating! I will admit, I immediately got a piece of bread & poured some on it right then. I expected a strong flavor of garlic, but what I got was a smooth, smoky, slightly sweet taste. The roasted garlic with the other ingredients was an incredible blend of seasonings & the sweet/savory mix was just right. I have never had a BBQ sauce that had garlic as the star, but this one should get an Academy award! It had the best garlic flavor & it just opened up my cooks brain to all kinds of uses for this delicious sauce.
Holding back my need to hide the bottle in the fridge, I poured about half a cup in a bowl, handed my husband the bbq brush & steaks & followed him to the (my) Weber grill. I cook my steaks on high direct heat & use a flipper to turn them. Never...Never...Never use a fork to turn meat on the grill please, when you pierce the meat all those wonderful juices go right down the grates...So use a flipper or tongs if you must. Our steaks were a little more than an inch thick so we cooked them on both sides for about 2-3 minutes to get a medium pink center. The grill has to be smoking hot when you put them on to sear the meat & lock in those luscious juices!

Husband brushing the steaks, me giving unwanted directions!
After placing them on the grill we brushed them with a liberal amount of Williamson Bro's Roasted Garlic BBQ sauce. When we turned the steak to the other side we give it some of that wonderful garlic love too!

The quality of a BBQ sauce shows when it doesn't burn on the grill
The temperature of my grill in this photo is about 500 degrees, the sauce is shiny & not burning

Great grilling techniques & high quality products produce the result you are looking for everytime. Williamson Bros BBQ sauce didn't burn, scorch, or change flavor as some sauces do. It produced a steak that had deep flavor, smoky after tones & sweet garlic notes that will be a dinner we will all remember for a good while.

http://www.williamsonbros.com
When you order this sauce & it arrives at your front door, even if your not from the South...you'll still feel the Southern style BBQ love, I promise!
Watch for our reviews of the other 4 sauces soon!
Thanks again to Williamson Bro's BBQ for introducing me to their products!
Tuesday, July 12, 2011
Spicy Cole Slaw with Candied Jalapenos
I love cole slaw. It's so easy now that they do all the shredding for you. I know fresh chopped cabbage is better & I should tell you to use that, but sometimes we need things that are really quick & easy!

Cole slaw is one of those salads that can take on many different flavors. One of our favorites would be Spicy Cole Slaw with Candied Jalapenos. It's great with BBQ, burgers or anything off the grill.
Spicy Cole Slaw
1 package of precut slaw mix
2 tablespoons of Franks Sweet Red Chili
1/2 cup pineapple tidbits, drained well
reserve 1 tablespoon of the pineapple juice
2 tablespoons of chopped candied jalapenos (recipe below)
1 tablespoon finely chopped red onion
Mix the Frank's Sweet Red Chili sauce & 1 tablespoon of the pineapple juice.
Add this to the slaw, then add all other ingredients.
Toss well to coat.
Will still look a little dry, but the cabbage will release moisture as it sits, so don't add more wet ingredients.
When you are ready to serve, if it looks to dry add a little more of the Franks before serving.
Place in fridge & let chill for at least 30 minutes before serving for the full flavor to develop.
Candied Jalapeno Peppers
4 large jalapeno peppers, washed well
1/2 cup sugar
1/2 cup water
1/8 tsp of kosher salt

Wash jalapenos & cut into rings. You can remove the seeds if you would like less heat. I enjoy the heat & left them in.
In large skillet mix water & sugar, add the salt. Bring to a low boil, mixing well.

Reduce heat to medium-high heat & add jalapenos.
Stir to coat peppers with sugar mixture, cook for 3 minutes.

Remove & let cool the peppers cool.

After they are cooled, bring sugar mixture back to medium-high heat & cook again for 3 minutes. Remove & cool.

Can be stored in fridge until ready to use in recipes. Use within a week for food safety sake!
Cole slaw is one of those salads that can take on many different flavors. One of our favorites would be Spicy Cole Slaw with Candied Jalapenos. It's great with BBQ, burgers or anything off the grill.
Spicy Cole Slaw
1 package of precut slaw mix
2 tablespoons of Franks Sweet Red Chili
1/2 cup pineapple tidbits, drained well
reserve 1 tablespoon of the pineapple juice
2 tablespoons of chopped candied jalapenos (recipe below)
1 tablespoon finely chopped red onion
Mix the Frank's Sweet Red Chili sauce & 1 tablespoon of the pineapple juice.
Add this to the slaw, then add all other ingredients.
Toss well to coat.
Will still look a little dry, but the cabbage will release moisture as it sits, so don't add more wet ingredients.
When you are ready to serve, if it looks to dry add a little more of the Franks before serving.
Place in fridge & let chill for at least 30 minutes before serving for the full flavor to develop.
Candied Jalapeno Peppers
4 large jalapeno peppers, washed well
1/2 cup sugar
1/2 cup water
1/8 tsp of kosher salt

Wash jalapenos & cut into rings. You can remove the seeds if you would like less heat. I enjoy the heat & left them in.
In large skillet mix water & sugar, add the salt. Bring to a low boil, mixing well.

Reduce heat to medium-high heat & add jalapenos.
Stir to coat peppers with sugar mixture, cook for 3 minutes.

Remove & let cool the peppers cool.

After they are cooled, bring sugar mixture back to medium-high heat & cook again for 3 minutes. Remove & cool.

Can be stored in fridge until ready to use in recipes. Use within a week for food safety sake!
Friday, June 24, 2011
Mesquite Charred Corn & Poblano Salsa
This recipe is for a cold salsa made with mesquite smoked fresh corn, poblano peppers, garlic, fire roasted tomatoes, cilantro & spices. I added chipotle in adobo sauce for ours, we like it a little kicked up!
This recipe requires the following ingredients:
- 4 ears of fresh corn
- 2 large poblano peppers
- canola or olive oil
- 1 pod of garlic
- 2 Tsp mesquite liquid smoke
- 2 Tablespoons chopped cilantro
- 1/2 cup chopped red onion
- 1 15oz can chopped fire roasted tomatoes, or fresh if you have them
- 3 chipotle peppers in adobo sauce (leave out if you don't like the heat!)
- 1 tsp Texas Chili Blend, or your favorite chili powder
- 1 lime, juiced
- 1 cup mesquite wood chips
- salt to taste
 |
Mesquite Charred Corn & Poblano Salsa
|
 |
 |
 |
|
 |
|


 |
|
 |
|
Monday, February 7, 2011
Confessions of a Cast Iron Skillet Hoarder
Cast Iron skillets and cookware hold a fascination for me that at times is bordering on obsession. If I see a rusty old iron skillet at a garage sale I feel sad that someone is tossing it out. Do they not know what they are throwing away? We were at an estate sale once and all of the china, costume jewelry and linens were hugely overpriced. As I was walking through the sale I noticed a cardboard box under the table. Being the person I am, I had to see what was in that box. When I pulled away some old plastic bowls, I saw something black, greasy & rusty. My heart started to race because I knew this box contained a treasure that no one else cared about. I unearthed two iron skillets that had letters on the bottom and I could see a G, an I and a D. Being an iron skillet nut I knew these were Griswold skillets and from the look they were old. I ask the person running the sale how much she wanted for the skillets....she said "oh, I'll take a buck a piece for those old things" I had to turn around to keep my feelings to myself.


When I look at these skillets I always imagine the person who owned them. I see them cooking for a houseful of kids or maybe using them in a cafe. Maybe a chuck-wagon cook used them on the wagon trains crossing the plains. Maybe some young bride that knew no better gave them away for a new shiny aluminum skillet cause it was all the rage! I have been lucky enough in my life to have been taught to cook with iron skillets. And now I have inherited most of those from our grandmothers and great-grandmothers. I don't have to create fantasy meals in my mind of what these black jewels held, I experienced it first hand.
When our son was young he was in Cub Scouts and we continued our love of iron cooking with the Dutch Oven. There is something about building a fire outside and cooking a cobbler in an iron pot. It's not a fancy pastry but there is nothing like it in the world. Little boys are fascinated with cooking outside and that worked out fine for myself and my husband because we are too!
Many people don't want iron skillets or cookware because they are afraid that the food will stick, that they are hard to clean and that it will affect the taste of the food. I agree there are special ways to care for cast iron but once it's "seasoned" it's just the best thing in the world.
Highly acidic food such as tomatoes will cook darker, but if you cook them on lower heat they will be fine. I can scramble eggs that are light and fluffy in my skillets because they are treated and seasoned well. The longer you use an iron skillet the better it cooks. This is my treasured corn stick pan that belonged to my husbands grandmother. I just baked cornbread sticks, removed them and washed with it in warm soapy water. I place it in a 200 degree oven and let it dry then rub it lightly with a paper towel with a tiny bit of canola oil. Now it's ready for the next time I want to make corn sticks. It's that easy!


This website will help you with the care & cleaning of your iron cookware.www.lodgemfg.com
If you don't have any of these old iron skillets, go to an antique store and rescue one..or two..or three...! They will be so happy to be providing someone with delicious food again that they will serve you for a lifetime.


When I look at these skillets I always imagine the person who owned them. I see them cooking for a houseful of kids or maybe using them in a cafe. Maybe a chuck-wagon cook used them on the wagon trains crossing the plains. Maybe some young bride that knew no better gave them away for a new shiny aluminum skillet cause it was all the rage! I have been lucky enough in my life to have been taught to cook with iron skillets. And now I have inherited most of those from our grandmothers and great-grandmothers. I don't have to create fantasy meals in my mind of what these black jewels held, I experienced it first hand.
When our son was young he was in Cub Scouts and we continued our love of iron cooking with the Dutch Oven. There is something about building a fire outside and cooking a cobbler in an iron pot. It's not a fancy pastry but there is nothing like it in the world. Little boys are fascinated with cooking outside and that worked out fine for myself and my husband because we are too!
Many people don't want iron skillets or cookware because they are afraid that the food will stick, that they are hard to clean and that it will affect the taste of the food. I agree there are special ways to care for cast iron but once it's "seasoned" it's just the best thing in the world.
Highly acidic food such as tomatoes will cook darker, but if you cook them on lower heat they will be fine. I can scramble eggs that are light and fluffy in my skillets because they are treated and seasoned well. The longer you use an iron skillet the better it cooks. This is my treasured corn stick pan that belonged to my husbands grandmother. I just baked cornbread sticks, removed them and washed with it in warm soapy water. I place it in a 200 degree oven and let it dry then rub it lightly with a paper towel with a tiny bit of canola oil. Now it's ready for the next time I want to make corn sticks. It's that easy!


This website will help you with the care & cleaning of your iron cookware.www.lodgemfg.com
If you don't have any of these old iron skillets, go to an antique store and rescue one..or two..or three...! They will be so happy to be providing someone with delicious food again that they will serve you for a lifetime.
Wednesday, February 2, 2011
Pork Chili Verde Enchiladas
Living in Colorado in the fall taught me to long for New Mexico Hatch Chilies. If you have ever been lucky enough to smell these beautiful chilies roasting, you know what I mean! There is a festival in New Mexico to celebrate the Hatch Chili the first weekend in September. They roast these peppers in a huge metal drum with a handle that turns the chilies over an open flame. The perfume they give off while roasting will make your mouth water if you love Southwestern or Tex-Mex food. 

Last Fall our local grocery store here in Nebraska sold Hatch chilies for 2 weeks. I went crazy buying, roasting, and freezing this peppers. All year long I used them to add to recipes and am beginning to run out! Yesterday I sat gazing at a boneless pork shoulder roast wondering what it would be at dinner time? My mind went blank until I started moving things around in the freezer. I found my Hatch chilies laying calmly under a bag of green beans and knew what we would have for dinner...Pork Chili Verde Enchiladas!
Let me say first that this is not a quick meal. If you are going to be home all day and want to make this recipe go for it. It's not a hard recipe,it just needs to cook several hours to develop the full flavor of the Chili Verde. I promise if you make it you will not be sorry! You can use an Anaheim Chili pepper if it's not Hatch Chili season. Some people use canned green chili's, you can but you won't get the same flavor. If you can't get the Anaheim green chili, use a Poblano & Jalapeno pepper. Tomatillos are the other ingredient that makes it a salsa verde or chili verde. These little jewels look like tiny green tomatoes with a brown paper on the outside.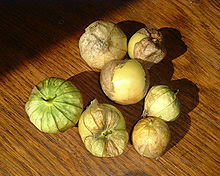
To prepare your chili peppers for the verde you need to roast them on the grill or in the oven. Wash them well, pat dry and rub lightly with canola oil. Place them on a pan in a 375 degree oven or over a medium flame if using a gas grill. Roast peppers until skin blisters & is blackened. You will need to turn them several times to prevent burning. Take them out while hot and place them in a ziploc bag. Let them cool for 15 minutes or more,then while in the bag, rub the pepper to remove the charred skin. Transfer to a cutting board and remove stem. Cut peppers open and remove seeds seeds and any remaining charred skin. Chop in small pieces and set aside. Any pepper, tomatillo, onion, or garlic that is used in a salsa verde or chili verde needs to be roasted in this same way. This creates the roasted & mellow taste you want for this dish. Tomatillos do not have to have charred skins removed, but chop in 1/4 inch chunks after they are roasted, save juice that runs from them to add to chili.


Pork Chili Verde Enchiladas
Makes 12 Servings
2 lbs boneless lean Pork Shoulder-cut into 1/2 inch cubes & seasoned with
salt & pepper
3/4 cup flour,for dredging meat (can use gluten free flour)
1/2 tsp salt
2 tsp black pepper
2 tablespoon cumin
1 tsp Mexican oregano
1/4 cup canola oil
1 medium onion-peeled & roasted then diced into 1/4 inch pieces
2 large Hatch or Anaheim green chili's roasted & diced into 1/4 inch pieces
1 large jalapeno -roasted & diced into 1/4 inch pieces
4 tomatillos- husks removed &roasted then diced into 1/4 inch pieces
4 cloves roasted garlic, roasted then peeled & finely minced
4 cups chicken broth
12 corn tortillas
2 cups shredded cheese, Monterey jack or pepper jack, reserve part for topping the enchiladas
1/4 cup canola oil
1 tsp chopped fresh cilantro for garnish
After roasting and preparing peppers, onions, tomatillos, chop ingredients into 1/4 in pieces.
Finely mince the garlic, if roasted it will be soft & won't need mincing.
Mix 3/4 cup flour with 1/2 tsp salt, 1 tsp black pepper, 1 Tablespoon cumin,
1/2 tsp Mexican oregano. Salt & pepper pork and cut into 1/2 inch cubes and dredge in flour mixture.
In a large dutch oven, heat 1/4 cup canola oil to medium-high to sear meat. Shake off excessive flour mixture and place coated pork pieces in the dutch oven. Cook until light brown and then reduce heat to medium.
Add peppers, onions, tomatillos & garlic to meat and stir to combine. Then add remaining spices: 1 tsp black pepper, 1 Tablespoon cumin,& 1/2 tsp Mexican oregano. Stir spices into pepper/meat mixture and cook for 1-2 minutes. Add 4 cups of chicken broth and stir well. Cook uncovered on low heat for 1-2 hours, or until sauce is thick and pork is fork tender. Stir occasionally to prevent sticking. If it gets to thick add more chicken broth or liquid in small amounts desired consistency. Taste before serving and add salt if needed.
To make Enchiladas
Preheat oven to 400 degrees
In a 13x9 baking dish ladle small amount of the Chili Verde sauce on the bottom. In a small non-stick skillet, heat 1/4 cup canola oil to medium high heat. Oil should not be so hot it fries tortilla hard, just softens them enough to roll. Takes about 30 seconds on each side. When you remove it from the oil, blot with a paper towel. After warming all tortillas begin rolling the Enchilada's by placing grated cheese down the center of a tortilla. Roll Enchiladas cigar fashion and place seam side down in baking dish. Ladle Chili Verde over the top of Enchiladas. May not take all the chili to cover, but can be served on the side for those who want more. Top with remaining grated cheese. Place in preheated 400 degree oven & bake for 15 minutes. Garnish with cilantro & serve.

When I made this recipe last night, I cut the pork larger than 1/2 inch, closer to 1 inch. I thought the 1 inch was a little too large but my husband liked the bigger pieces. It's just a matter of preference. Hope you try this and enjoy it. If you do , post a comment and let me know what you think.


Last Fall our local grocery store here in Nebraska sold Hatch chilies for 2 weeks. I went crazy buying, roasting, and freezing this peppers. All year long I used them to add to recipes and am beginning to run out! Yesterday I sat gazing at a boneless pork shoulder roast wondering what it would be at dinner time? My mind went blank until I started moving things around in the freezer. I found my Hatch chilies laying calmly under a bag of green beans and knew what we would have for dinner...Pork Chili Verde Enchiladas!
Let me say first that this is not a quick meal. If you are going to be home all day and want to make this recipe go for it. It's not a hard recipe,it just needs to cook several hours to develop the full flavor of the Chili Verde. I promise if you make it you will not be sorry! You can use an Anaheim Chili pepper if it's not Hatch Chili season. Some people use canned green chili's, you can but you won't get the same flavor. If you can't get the Anaheim green chili, use a Poblano & Jalapeno pepper. Tomatillos are the other ingredient that makes it a salsa verde or chili verde. These little jewels look like tiny green tomatoes with a brown paper on the outside.

To prepare your chili peppers for the verde you need to roast them on the grill or in the oven. Wash them well, pat dry and rub lightly with canola oil. Place them on a pan in a 375 degree oven or over a medium flame if using a gas grill. Roast peppers until skin blisters & is blackened. You will need to turn them several times to prevent burning. Take them out while hot and place them in a ziploc bag. Let them cool for 15 minutes or more,then while in the bag, rub the pepper to remove the charred skin. Transfer to a cutting board and remove stem. Cut peppers open and remove seeds seeds and any remaining charred skin. Chop in small pieces and set aside. Any pepper, tomatillo, onion, or garlic that is used in a salsa verde or chili verde needs to be roasted in this same way. This creates the roasted & mellow taste you want for this dish. Tomatillos do not have to have charred skins removed, but chop in 1/4 inch chunks after they are roasted, save juice that runs from them to add to chili.


Pork Chili Verde Enchiladas
Makes 12 Servings
2 lbs boneless lean Pork Shoulder-cut into 1/2 inch cubes & seasoned with
salt & pepper
3/4 cup flour,for dredging meat (can use gluten free flour)
1/2 tsp salt
2 tsp black pepper
2 tablespoon cumin
1 tsp Mexican oregano
1/4 cup canola oil
1 medium onion-peeled & roasted then diced into 1/4 inch pieces
2 large Hatch or Anaheim green chili's roasted & diced into 1/4 inch pieces
1 large jalapeno -roasted & diced into 1/4 inch pieces
4 tomatillos- husks removed &roasted then diced into 1/4 inch pieces
4 cloves roasted garlic, roasted then peeled & finely minced
4 cups chicken broth
12 corn tortillas
2 cups shredded cheese, Monterey jack or pepper jack, reserve part for topping the enchiladas
1/4 cup canola oil
1 tsp chopped fresh cilantro for garnish
After roasting and preparing peppers, onions, tomatillos, chop ingredients into 1/4 in pieces.
Finely mince the garlic, if roasted it will be soft & won't need mincing.
Mix 3/4 cup flour with 1/2 tsp salt, 1 tsp black pepper, 1 Tablespoon cumin,
1/2 tsp Mexican oregano. Salt & pepper pork and cut into 1/2 inch cubes and dredge in flour mixture.
In a large dutch oven, heat 1/4 cup canola oil to medium-high to sear meat. Shake off excessive flour mixture and place coated pork pieces in the dutch oven. Cook until light brown and then reduce heat to medium.
Add peppers, onions, tomatillos & garlic to meat and stir to combine. Then add remaining spices: 1 tsp black pepper, 1 Tablespoon cumin,& 1/2 tsp Mexican oregano. Stir spices into pepper/meat mixture and cook for 1-2 minutes. Add 4 cups of chicken broth and stir well. Cook uncovered on low heat for 1-2 hours, or until sauce is thick and pork is fork tender. Stir occasionally to prevent sticking. If it gets to thick add more chicken broth or liquid in small amounts desired consistency. Taste before serving and add salt if needed.
To make Enchiladas
Preheat oven to 400 degrees
In a 13x9 baking dish ladle small amount of the Chili Verde sauce on the bottom. In a small non-stick skillet, heat 1/4 cup canola oil to medium high heat. Oil should not be so hot it fries tortilla hard, just softens them enough to roll. Takes about 30 seconds on each side. When you remove it from the oil, blot with a paper towel. After warming all tortillas begin rolling the Enchilada's by placing grated cheese down the center of a tortilla. Roll Enchiladas cigar fashion and place seam side down in baking dish. Ladle Chili Verde over the top of Enchiladas. May not take all the chili to cover, but can be served on the side for those who want more. Top with remaining grated cheese. Place in preheated 400 degree oven & bake for 15 minutes. Garnish with cilantro & serve.

When I made this recipe last night, I cut the pork larger than 1/2 inch, closer to 1 inch. I thought the 1 inch was a little too large but my husband liked the bigger pieces. It's just a matter of preference. Hope you try this and enjoy it. If you do , post a comment and let me know what you think.
Subscribe to:
Posts (Atom)